QNAP NVR-101 User Manual
Browse online or download User Manual for NAS & storage servers QNAP NVR-101. QNAP NVR-101 User manual
- Page / 101
- Table of contents
- TROUBLESHOOTING
- BOOKMARKS
- NVR-101 1
- Network Video Recorder 1
- Table of Contents 4
- Safety Warning 7
- Chapter 1 Introduction 8
- 1.3 System Architecture 11
- 1.4 Check Package Contents 13
- 1.5 Hardware Illustration 14
- Chapter 2 Install NVR 15
- 2.1 Install Hardware 17
- 2.2 System Configuration 20
- Chapter 3 Start to Use NVR 28
- 3.2 Monitoring Page 30
- 5.1 Quick Configuration 44
- 5.2 System Settings 48
- 5.3 Network Settings 51
- 5.4 Device Configuration 56
- 5.5 User Management 60
- 5.6 Camera Settings 64
- 5.7 System Tools 71
- One Touch Auto 74
- Video Backup 74
- USB 2.0 74
- 5.8 Logs & Statistics 78
- Chapter 7 Troubleshooting 82
- Appendix B LED Indication 87
- Software Specification 93
- Hardware Specification 94
- Technical Support 101
Summary of Contents
NVR-101 Network Video Recorder User Manual Version: 1.0.0 ©Copyright 2008. QNAP Systems, Inc. All Rights Reserved 1
High Reliability and Smart Features 1. Support extra secure data protection by RAID 1 (Mirroring) technology. 2. Support RAID 0, JBOD (Just a Bunch
Environment 4: NVR and IP camera are installed behind the router IP Address NVR 1 192.168.1.101 NVR 2 192.168.1.102 NVR 3 192.168.1.103 Router
101 Technical Support QNAP provides dedicated online support and customer service via instant messenger. You can contact us by the following mean
1.3 System Architecture The following illustrations show how NVR can be applied in different network environment. Network Surveillance Installation
Central Surveillance Deployment for International Enterprise 12
1.4 Check Package Contents Please check that your NVR package contains all the following items: 9 Network Video Recorder 9 Adaptor 9 Power Cord 9
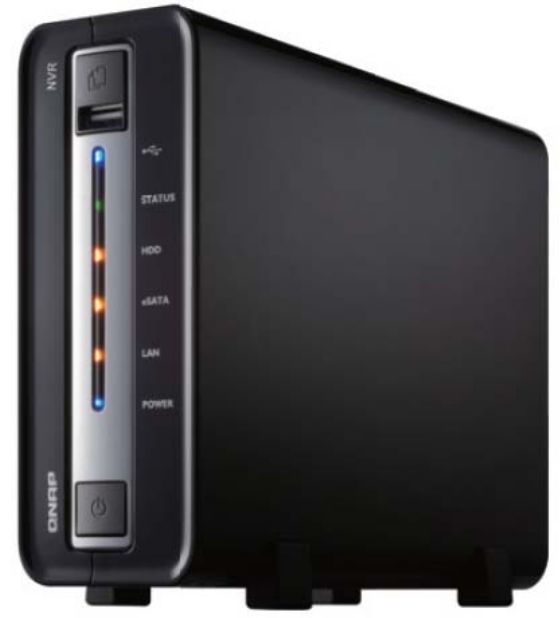
1.5 Hardware Illustration 1. One Touch Auto Video Backup Button 2. USB 2.0 Port 3. LED Indicators 4. Power Button 5. USB 2.0 Ports 6. eSATA
Chapter 2 Install NVR Pre-installation Notice Before installing NVR, please make sure the following items are ready: z Network connection devices z
Security Setting of Web Browser Please make sure the security level of the IE browser in Internet Options is set to Medium or lower. 16
Before you start to use NVR, please install the hardware and configure the system. 2.1 Install Hardware Please follow the steps below to install the
3. After installing the disk, cover NVR with the front case and fasten the round head screws. 4. Connect the network cable. 18
5. Connect the power cord and plug in the power cord to the socket. 6. Turn on the NVR. The server will beep once. Please wait for a while until
FOREWORD Thank you for choosing QNAP products! This user manual provides detailed instructions of using the product. Please read carefully and
2.2 System Configuration After server is turn on and ready, please insert the product CD to the CD-ROM drive of your computer and follow the steps b
Follow screen instructions to install Finder. Finder will run automatically then. If you are using Windows XP SP2, the following screen will be s
2. Execute Quick Setup Finder will detect the NVR in the network and ask if you want to perform quick setup. Click OK to continue. Note: If NVR is
The first page of the Quick Setup Wizard will be shown. Click Next to continue and complete the configuration. Note: Please make sure all the net
NVR will restart after changing the settings. When quick setup is completed, click Finish to continue. 24
3. Connect to NVR After finishing quick setup, you will return to the main screen of Finder. 25
Select a NVR on the menu and double click the server name to enter the monitoring screen. You must enter a correct user name and password to access
When the live video is displayed and the recording indicator is shown, you have successfully installed NVR. 27
Chapter 3 Start to Use NVR When you have installed NVR and other hardware, and connected it to the network, you can use the browser in your PC to co
2. Enter the user name and password to login NVR. Default User name: administrator Default Password: admin 3. To view NVR live video, you must in
Important Notice z Reading instruction Please read the safety warnings and user manual carefully before using this product. z Power supply This pro
3.2 Monitoring Page When you have successfully logged in NVR, the monitoring page will be shown. Select the display language. You can view the
Playback: Enter recording playback page. The administrator can assign user’s right to access this page. Snapshot: Take a snapshot on the selected
3.2.1 Live Video Window If the camera is properly configured, you can see the current video from the remote network camera within live video window.
Camera Status The camera status is indicated by the icons shown below: Icon Camera Status Scheduled or continuous recording in process This camera
3.2.2 Display Mode By changing display mode, you can easily adjust the visual effects when viewing video of single or multiple cameras. Single chann
Chapter 4 Playback Video Files To playback recording video of NVR is very easy to use. NVR provides an intuitive web interface to search and pl
2. The following page will be shown. To return to the monitoring page, click . To enter system administration page, click . 3. Select a net
6. A list of search result will appear on the right. Click to play the video file or to download the file to your PC. If there is more tha
8. When you click , the video file will be downloaded to your PC automatically. Note: If you do not have access authority of the cameras, you will
4.2 Access Recordings via Network File Service NVR provides the following three network file services for users to access the recorded video files o
Table of Contents Table of Contents ...4 Safety Warning ...
4.2.2 Web File Manager (HTTP) You can access recorded files from web browser by: z In Web Playback Interface, click . 40
4.2.3 FTP Server (FTP) You can access recorded files through FTP protocol by either: z In Web Playback Interface, click . z In Windows Internet E
Chapter 5 System Administration To login NVR system configuration page, please login the monitoring page as an administrator and click . The Sys
If the system is not configured yet, the Quick Configuration page will be open to guide you through the setup steps first. If there are questions,
5.1 Quick Configuration Please follow the instructions on the web page to configure NVR. Note: All changes to the settings will be effective only
Step 4. Enter the IP address, subnet mask and default gateway of the server. Step 5. Select the disk configuration to initialize the disk volume
Step 6. Initialize IP camera setting. You can add up to 4 cameras in camera setting. Select the camera model; enter the camera name and IP addres
Congratulations! Quick configuration is completed and you can start to use NVR. Click Start Monitoring to view the live video from the cameras o
5.2 System Settings You can configure basic system settings including server name, date & time, and view the system settings. 5.2.1 Server Na
5.2.2 Date & Time Set the date, time, and time zone according to your location. If the settings are incorrect, the following problems may occ
5.2.1 Server Name... 48 5.2.2 Date & Time...
5.2.3 View System Settings You can view all current system settings, e.g. server name, on this page. 50
5.3 Network Settings You can configure WAN and LAN settings, DDNS service, file service, host access control and view network settings in this sec
5.3.2 DDNS (Dynamic Domain Name) Service DDNS service enables users to connect NVR via domain name directly. There is no need to know the real IP
5.3.3 File Services You can enable SMB/ CIFS file service, Web File Manager and FTP service to access the recorded video files. These settings ar
5.3.4 Protocol Management To assign a specific port for accessing NVR via the web browser, please enable the option “Specify HTTP port number” and e
5.3.5 View Network Settings You can view current network settings and status of NVR in this section. 55
5.4 Device Configuration You can configure SATA disk, USB disk, and UPS settings in this section. 5.4.1 SATA Disk This page shows the model, size
You can create the disk volume of the following type: z Single Disk Volume Each disk will be used as a standalone disk. However, if a disk is dam
5.4.2 USB Disk NVR supports USB disks for backup storage. Connect the USB device to the USB port of the server, when the device is successfully d
5.4.3 UPS If there is UPS, you can enable UPS support. If the AC power is abnormal, the system will shut down according to the settings. If th
5.8.1 Event Logs... 78 5.8.2 System Information ...
5.5 User Management The server can be accessed by multiple users. For easier management and better control of users’ access right, you have to
5.5.1 Create user User Name The user name cannot be pure number. It must not exceed 32 characters. It is case-insensitive and supports doubl
5.5.2 Edit User Select a user on the list and click Edit. You can change the password, assign system administration and camera access control. H
5.5.3 Delete User To delete a user, select a user on the list and click Delete. Click OK to confirm. Note: System administrator cannot be deleted.
5.6 Camera Settings You can configure network camera, recording, schedule, alarm, and advanced settings. 5.6.1 Camera Configuration Please follow
5.6.2 Recording Settings Select a camera on the list and configure the recording resolution, frame rate, and quality. You can also enable manual
1. Starting and stopping manual recording will not influent scheduled or alarm recording tasks. They are independent processes. 2. All the settin
5.6.3 Schedule Settings You can select continuous recording or scheduled recording. The default setting is continuous recording. To set up a r
5.6.4 Alarm Settings You can enable alarm recording of the cameras. Recording will be triggered by alarm input of the camera or motion detected b
5.6.5 Advanced Settings You can configure advanced recording settings in this section. z Maximum period for each recording file: Configure the
Safety Warning 1. This product can operate normally in the temperature of 0ºC ~35ºC and relative humidity of 0%~85%. Please make sure the environm
delete recording data after 7 calendar days, on the 8th day, files recorded on the first day of each camera will be deleted so that NVR can start to s
5.7 System Tools System Tools enable you to optimize the system maintenance and management. You can set alert notification, restart or shut down
5.7.2 Restart/ Shut Down Follow the steps below to restart or shut down the server. 1. Enter the administration page and select Restart/ Shutdown i
5.7.3 Hardware Settings You can enable or disable the hardware functions of the server. z Enable configuration reset switch By enabling this optio
z Enable front video backup button NVR supports direct copy of recording data on the server to the connected USB device via the USB port. You can
5.7.4 System Update Before updating system firmware, please make sure the product model and firmware version are correct. Follow the steps below
5.7.5 Backup/ Restore/ Reset Settings z To backup all settings, including user accounts, server name and network configuration etc., click Backup
5.7.7 Ping Test To test the connection to a specific IP address, enter the IP address and click Test. 77
5.8 Logs & Statistics 5.8.1 Event Logs The server can store thousands of recent event logs, including warning, error, and information message
5.8.2 System Information This page shows the current system status for diagnosis. 79
Chapter 1 Introduction 1.1 Product Overview Thank you for choosing NVR-101 Network Video Recorder (hereafter referred to as NVR). NVR is a dedic
Chapter 6 System Maintenance This section provides a general overview on system maintenance. 6.1 Reset Administrator Password and Network Settings
6.2 Power Outage or Abnormal Shutdown In case of power outage or improper shutdown of the server, the server will resume to the state before it is s
Chapter 7 Troubleshooting 1. The monitoring screen did not display. Please check the following: A. Check if you have installed ActiveX when loggin
simultaneous connections to the monitoring page at maximum. For better recording performance, please do not open too many IE browsers to view the l
11. I cannot use the SMB, FTP, and Web File Manager of NVR. A. Please go to Network Settings-File Services page and check if these three functions
Appendix A Hard Disk Compatibility List The following hard disk models are verified by QNAP that are compatible with NVR. It is recommended to use
Seagate Barracuda 7200.9 ST3500641AS SATA II 7200 500 16 Seagate Barracuda 7200.9 ST3400633AS SATA II 7200 400 16 Seagate Barracuda 7200.9 ST3300622AS
Appendix B LED Indication NVR provides LED indicators for you to indicate system status and information easily. 1. USB Status 2. System Status 3. H
LED Display & System Status Overview LED LED Display & System Status Power Blue: Power is on LAN Blink in orange when accessing network HD
Appendix C Dynamic Domain Name Registration NVR supports DDNS service provided by DynDNS. You can go to DynDNS website http://www.dyndns.org/ to
Picture-in-Picture 4. Smart control of PTZ (Pan, Tilt, Zoom) & speed dome camera by direct clicking on video screen. 5. Support monitoring pre
Registration Procedure Please follow the steps below to register a dynamic domain name. This guide is for reference only. If there are any cha
2. Enter the user name, email address, and password to create an account for DDNS service. Please verify your email address to receive the confir
4. Configure the mailing lists if necessary. Then click Create Account. 5. When your account is successfully created, a confirmation message w
Appendix D Product Specifications Software Specification Video Display Mode Single, quad, Picture-in-Picture, Sequential mode Recording Cameras Up
Client PC Requirement CPU Pentium 4 CPU 2 GHz or higher Memory 512 MB or above Operation System Windows XP or later Browser Internet Explorer 6.0
Appendix E Network Camera Compatibility List IP3112/ IP3122 IP3111/ IP3121 IP3132 IP3135/ IP3137 PT3112/ PT3122 PT3117/ PT3127 IP7135/IP7137 IP7131/
Appendix F Configuration Examples Environment 1: NVR, IP Camera and monitoring PC are all in the same network Network Surveillance Installation for
Environment 2: NVR and IP camera are installed behind the router, while the monitoring PC is located remotely IP Address Mapped port in router N
In this example, to allow a remote PC to connect to NVR and the cameras, you need to: Step 1. Set up port mapping (virtual server) on the router. Fro
Environment 3: NVR and IP camera are all located remotely IP Address NVR 219.87.144.205 Camera 1 61.62.100.101 Camera 2 61.62.100.102 Camera 3
More documents for NAS & storage servers QNAP NVR-101

© 2020, manymanuals.com. All rights reserved. | 1.107 s |
 Manymanuals.com
 Manymanuals.de
 Manymanuals.fr
 Manymanuals.it
 Manymanuals.pl
 Manymanuals.cz
 Manymanuals.es
 Manymanuals-pt.com
Comments to this Manuals